
Getting Started with Flow
Welcome to Flow! In this guide, we’ll go through a few simple steps to get you up and running with the tool, introduce a few key ideas, and have you animating and exporting code in just a few minutes.
What is Flow?
Flow is an animation tool that is easy to learn and very powerful. It integrates tightly with Sketch, can be used to create all kinds of animated file types, and is especially fantastic for exporting production-ready code that developers will actually use.
Amazing Micro-Animations
Flow works best for animating components of your UI, which many people like to call micro-animations. If you’re new to the idea of component-based design or design systems, there’s tons of great reading out there about it, but in short: we designed Flow to work best for generating UI Animations that go into logos, buttons, and other lovely places where users interact.
Code Generation
Flow’s specialty is in translating static UI elements into beautiful animations. When a Designer is happy with their animations, Flow will generate clean animation code that Developers will actually use.
HTML
- HTML with JS / CSS
- HTML (using WebComponents)
- HTML Button
- HTML Button (using WebComponents)
iOS
- iOS (generates a full Xcode project)
- iOS Button
- iOS Launch Animation
- iOS Onboarding Animation
React
- React Button (Backed by HTML WebComponents)
SVG
- SVG files (coming very soon)
Full UI Concepts
You can also use Flow for mocking up full UI Concepts.
Media Production
If you’re looking to produce animations or ads, but won’t use code export, Flow still has a lot to offer. With Flow, you can create amazing animations and export them to high-res files that can be used for marketing, your portfolio, or other embeds because you can create media files like:
- GIF
- APNG
- MOV
- SVG
Use Sketch 52+
You can use Flow as a standalone application, but one of the most powerful ways to use it in conjunction with a Sketch file. This works really well for designers animating static design states for production.
If you are using Sketch, use files created in Sketch 52+. The file structures in Sketch 51 and below are not compatible with Flow.
All Sketch sample files included with Flow and on this website are created with Sketch 52. All Flow files are, of course, compatible.
The Welcome Window
When you first Launch Flow, you’re presented with the Welcome Window.
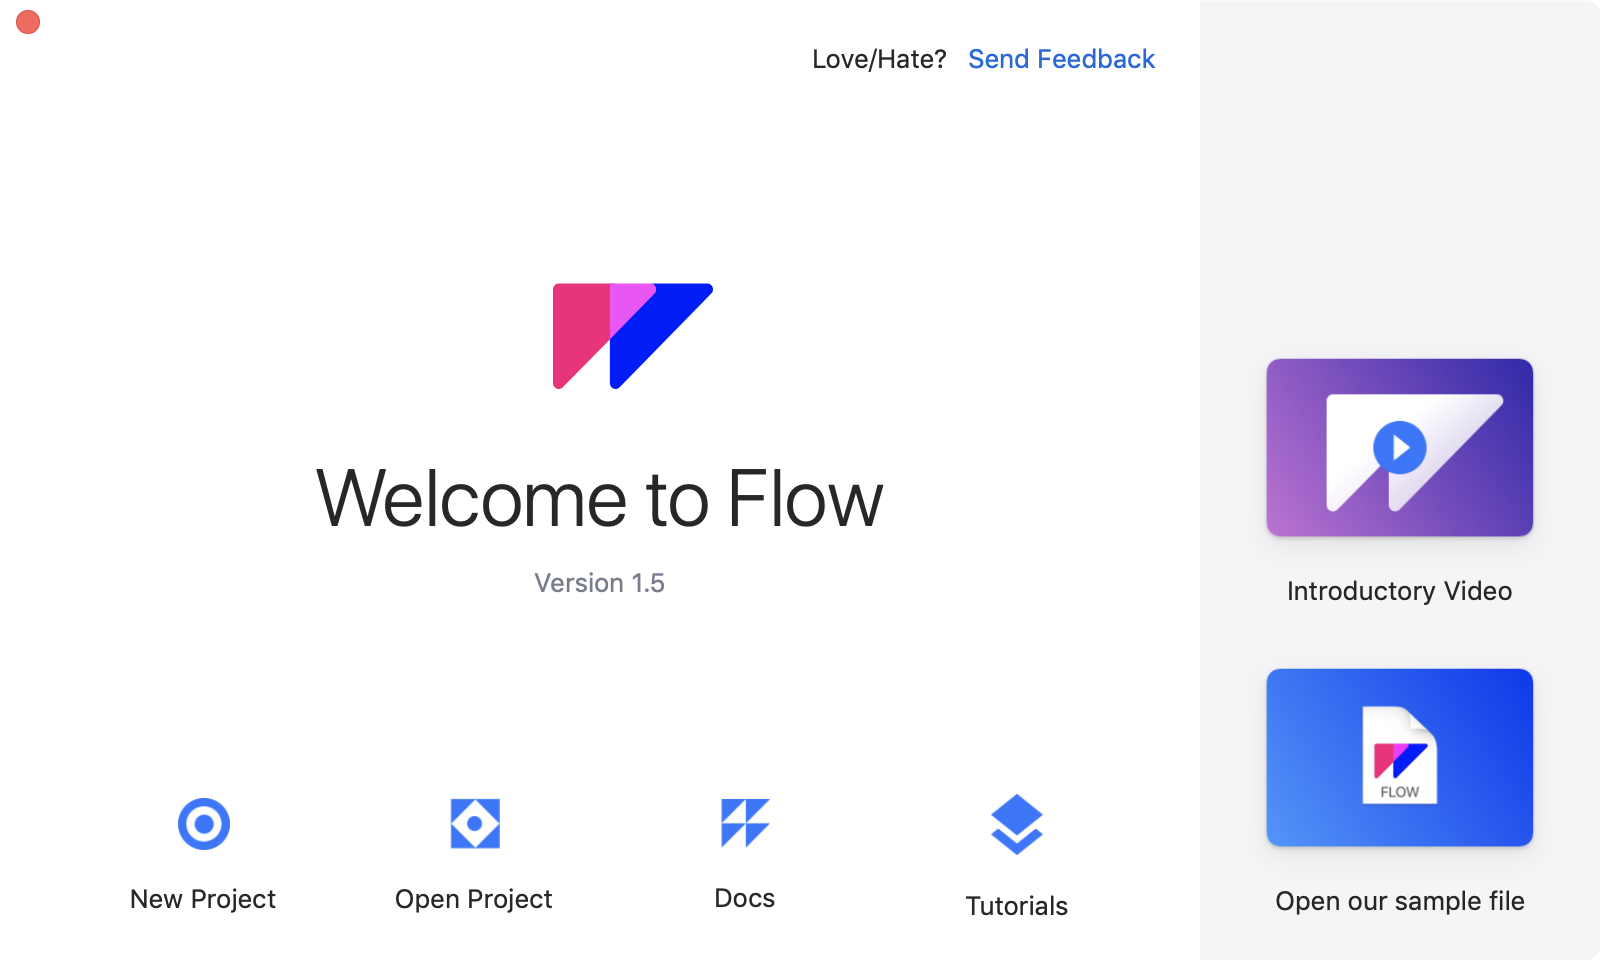
Flow’s Welcome Window has lots to offer you. In your spare time, we recommend taking a look at the introductory video and sample file, but for now, let’s click New Project and take a look at different ways you can create a new flow document.
The Interface
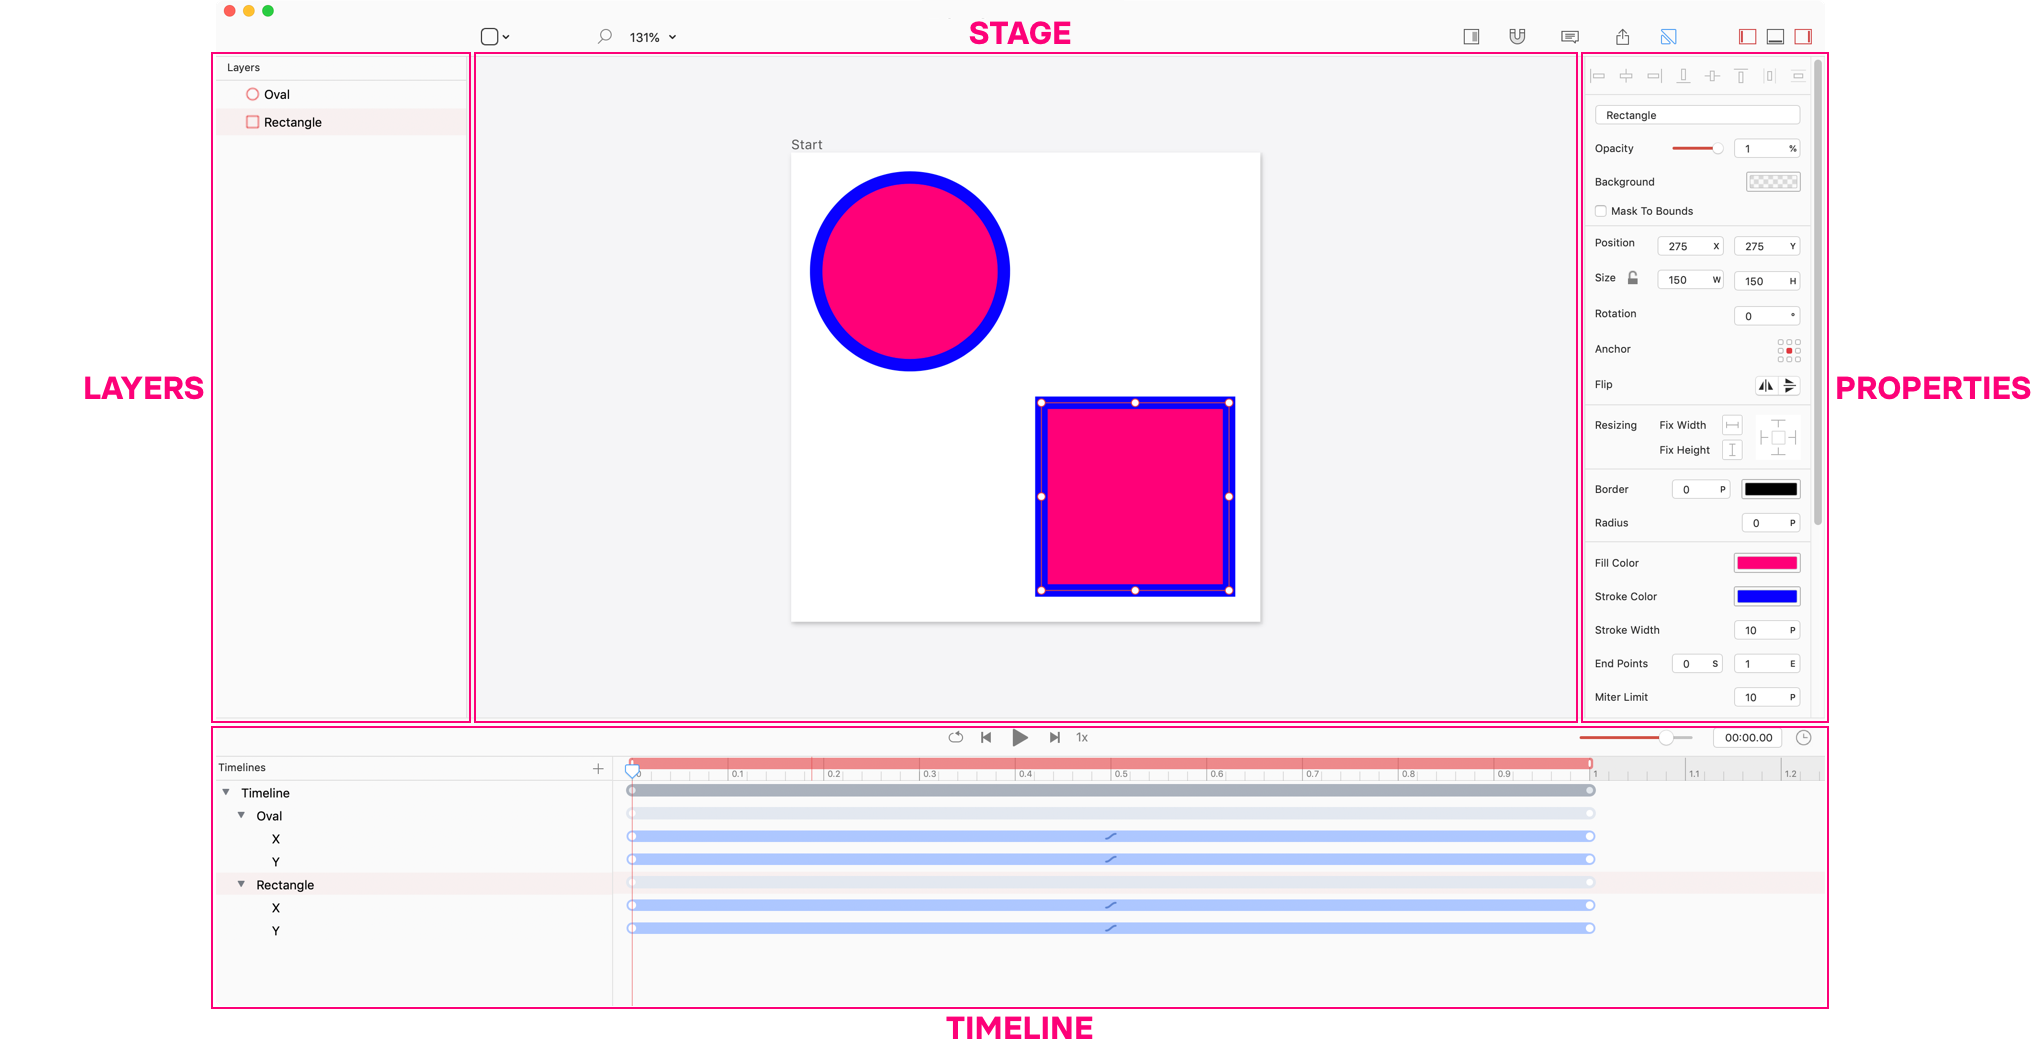
Flow’s interface has four main panels:
-
The
Layerspanel lists all the layers for the current design. If you’ve linked a Sketch file, Flow can import layers from that file. You can also add layers within Flow. -
The
Stagepositioned in the middle, shows all visible layers on the scene. The scene is the canvas you’re animating on. -
The
Propertiespanel on the right is only active when selecting layers, keyvalues or the scene. It shows all the properties of the selected object, most of which you can animate! -
The
Timelinepanel on the bottom is where the action happens in Flow. The timeline shows all the different animations and allows you to change timing, transitions, length and more. We’ll spend most of our time introducing this area, since it’s the most important.One thing to keep in mind about the timeline: it only shows animated layers.
Three Steps to Production Ready Animation
One of the best things about Flow is how quick and easy it is to go from an empty file to production-ready code. And the best way for you to understand that is to learn by doing: it only takes three steps!
Create a Flow Project
You can create either an empty Flow project from scratch, or use a Sketch file.
From a Sketch File
Download our sample Sketch file below to get started.
When you open it in Sketch, you should see the this.
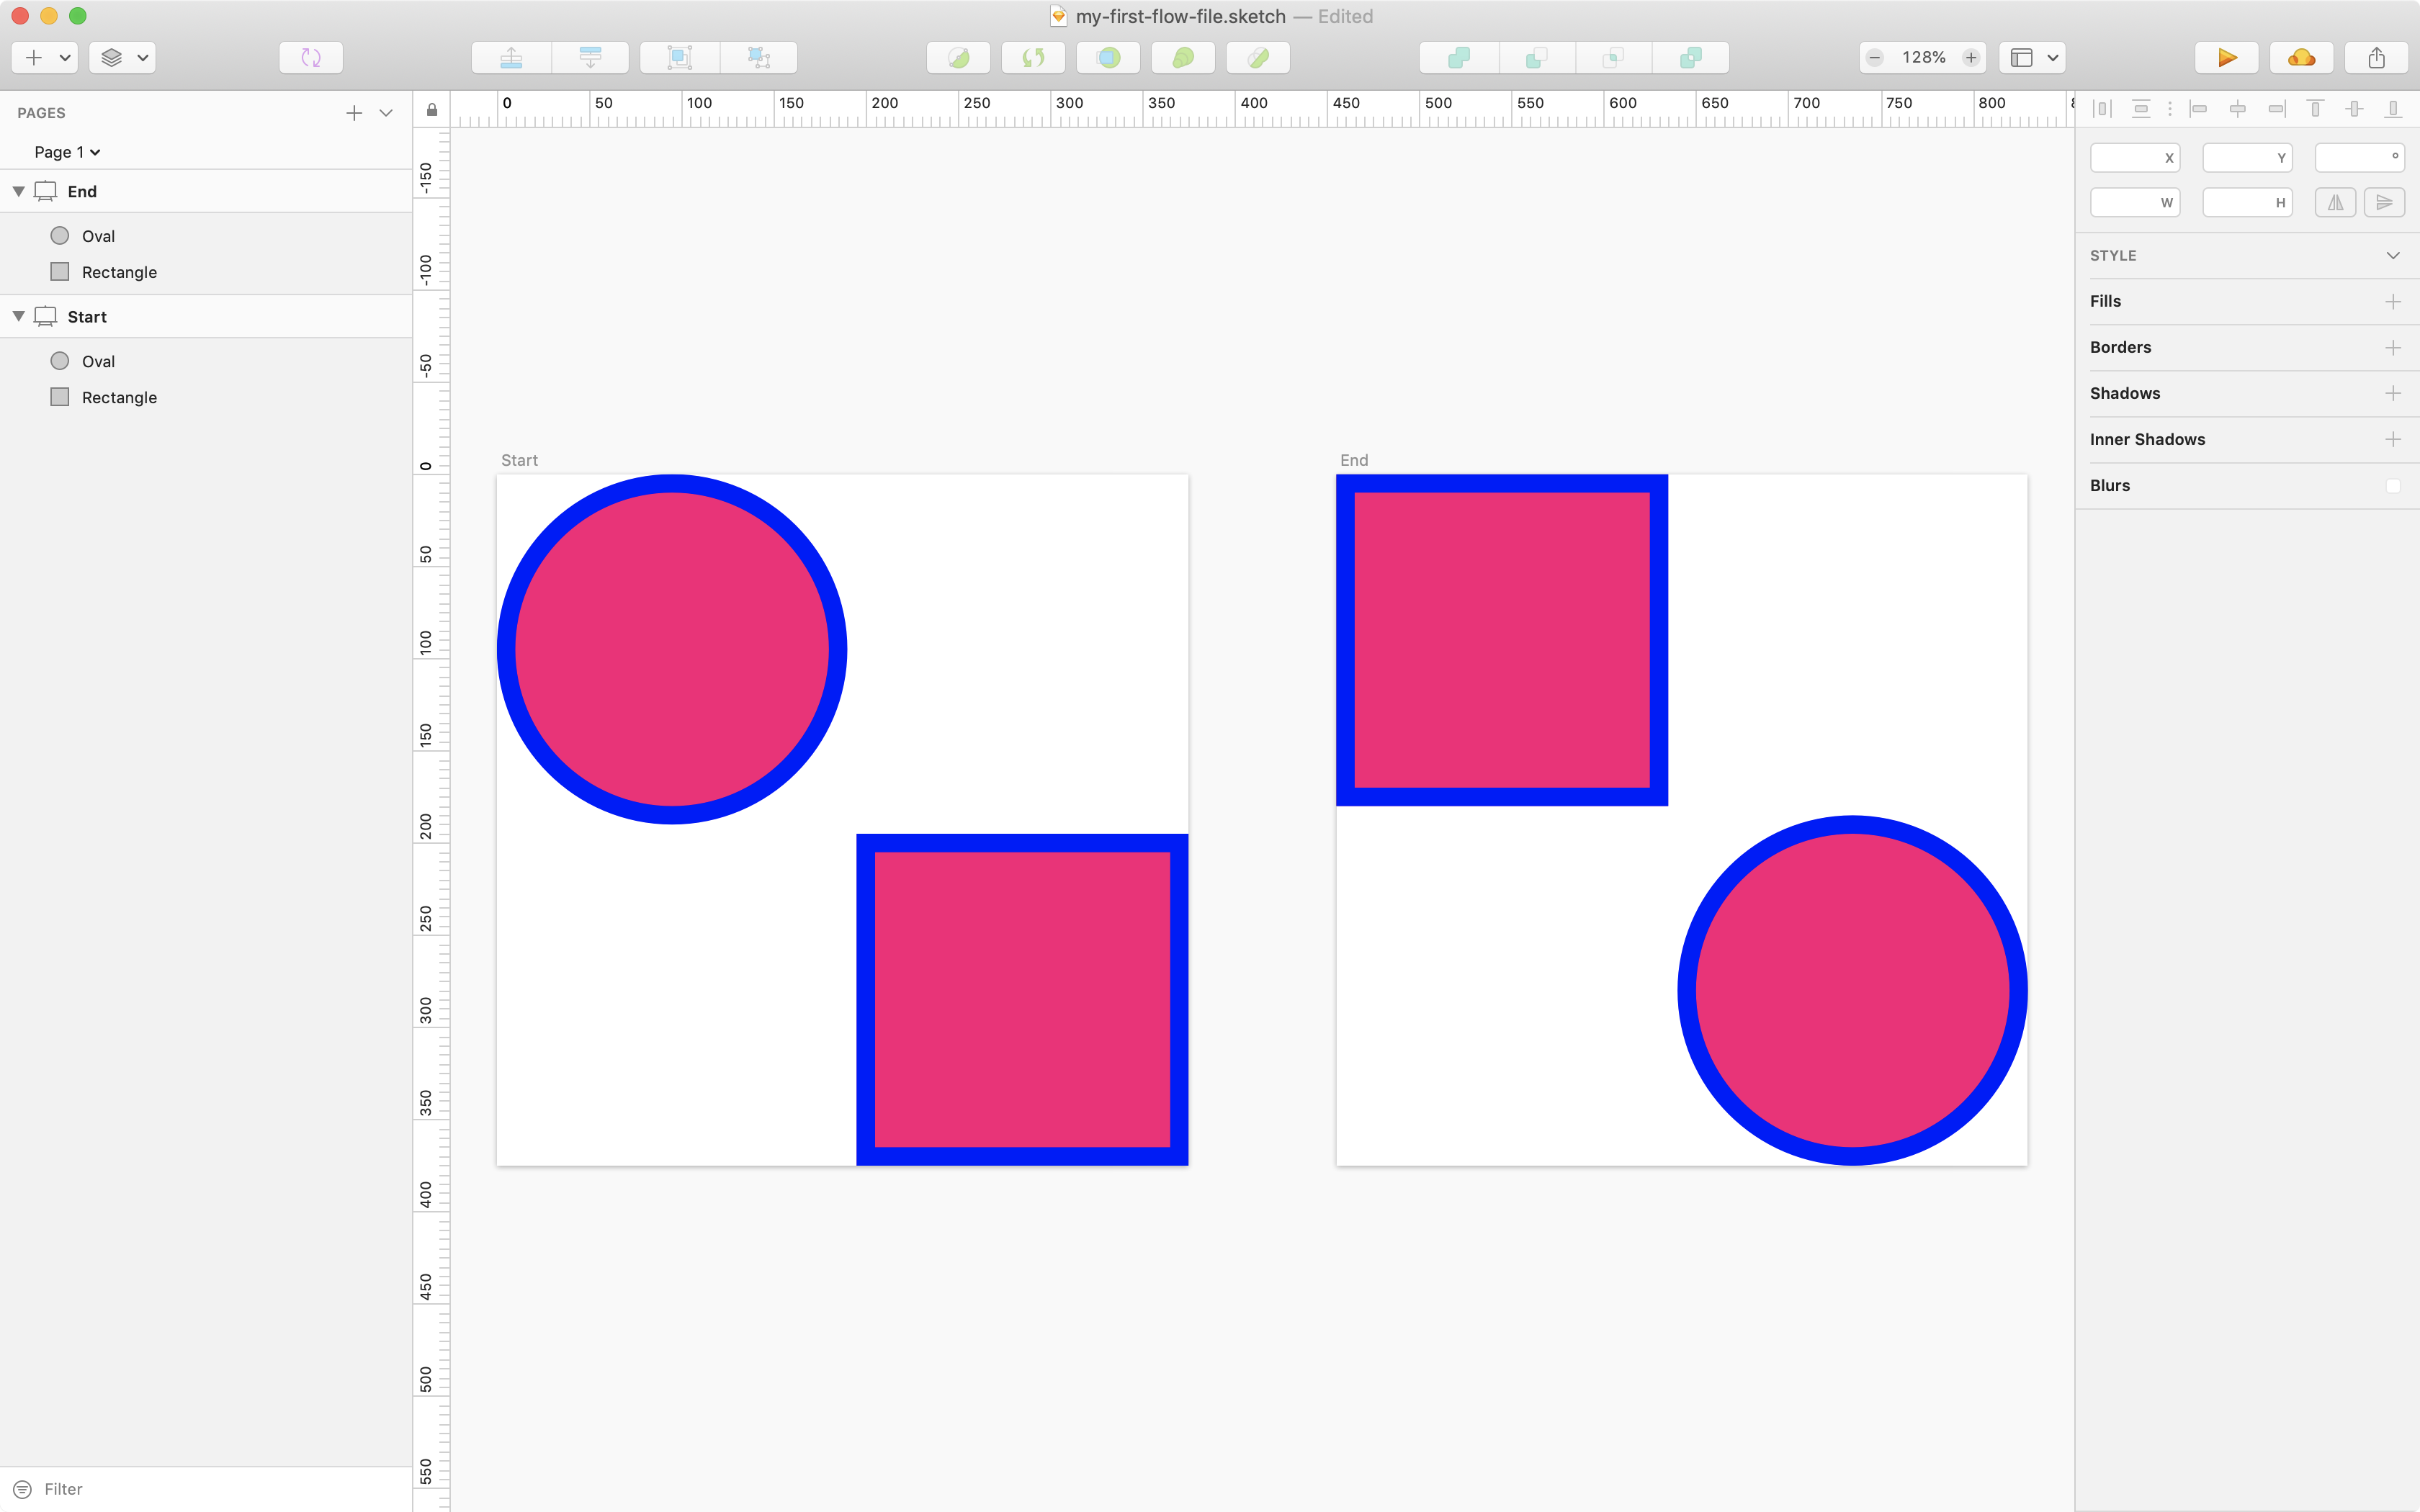
Note the following:
- There are two artboards, each with two layers in which the Rectangle and Oval change positions.
- The artboards are identical in size.
- The layer hierarchies are identical between the two artboards: there are no additional layers in the End artboard (or the Start artboard), the layers are in the same order, and the layer types are the same (i.e. both shapes).
The basic principle of importing Sketch files into Flow is that the artboards representing a start and end state must be identical. For more on the specifics, see Import and Animate Sketch files.
Next..
Import the Sketch file into Flow by:
- Creating a new project and selecting
Link a Sketch File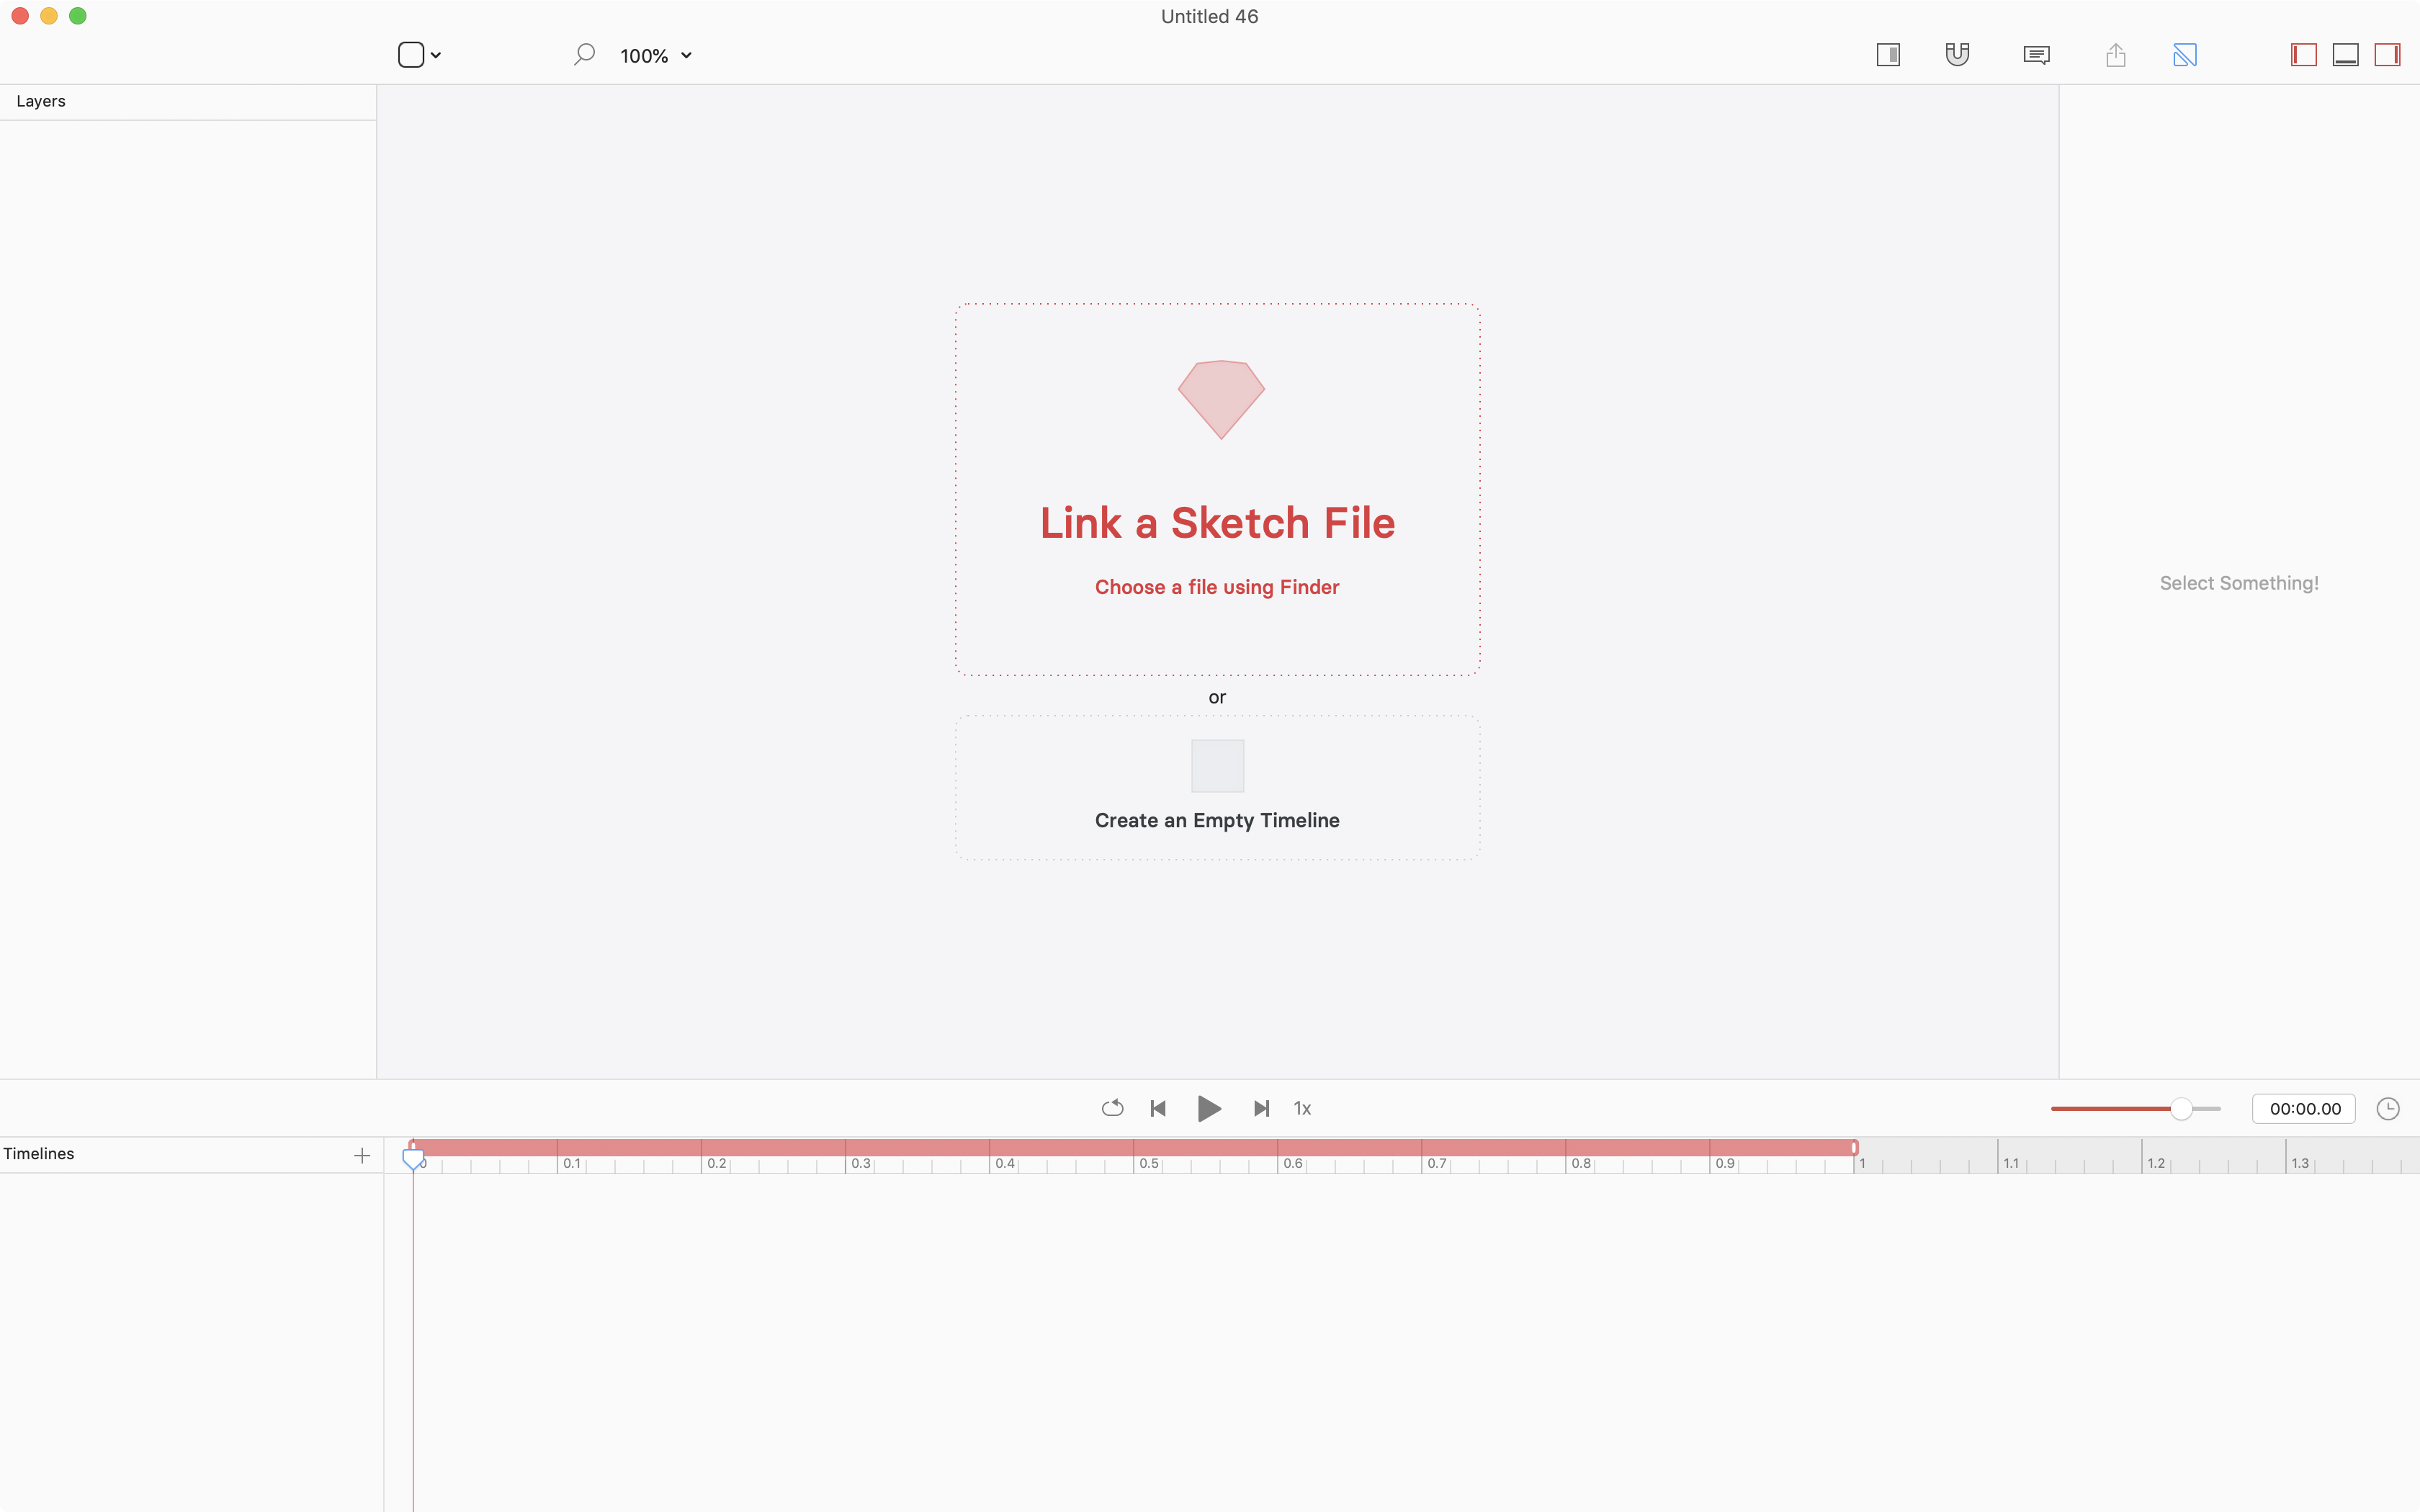
An empty project has two options: link a Sketch file, or create an empty timeline. - Navigate to your file and click
Open. - Select an artboard for the Start and End of the animation. Drag and drop the artboards in your file to get the following:
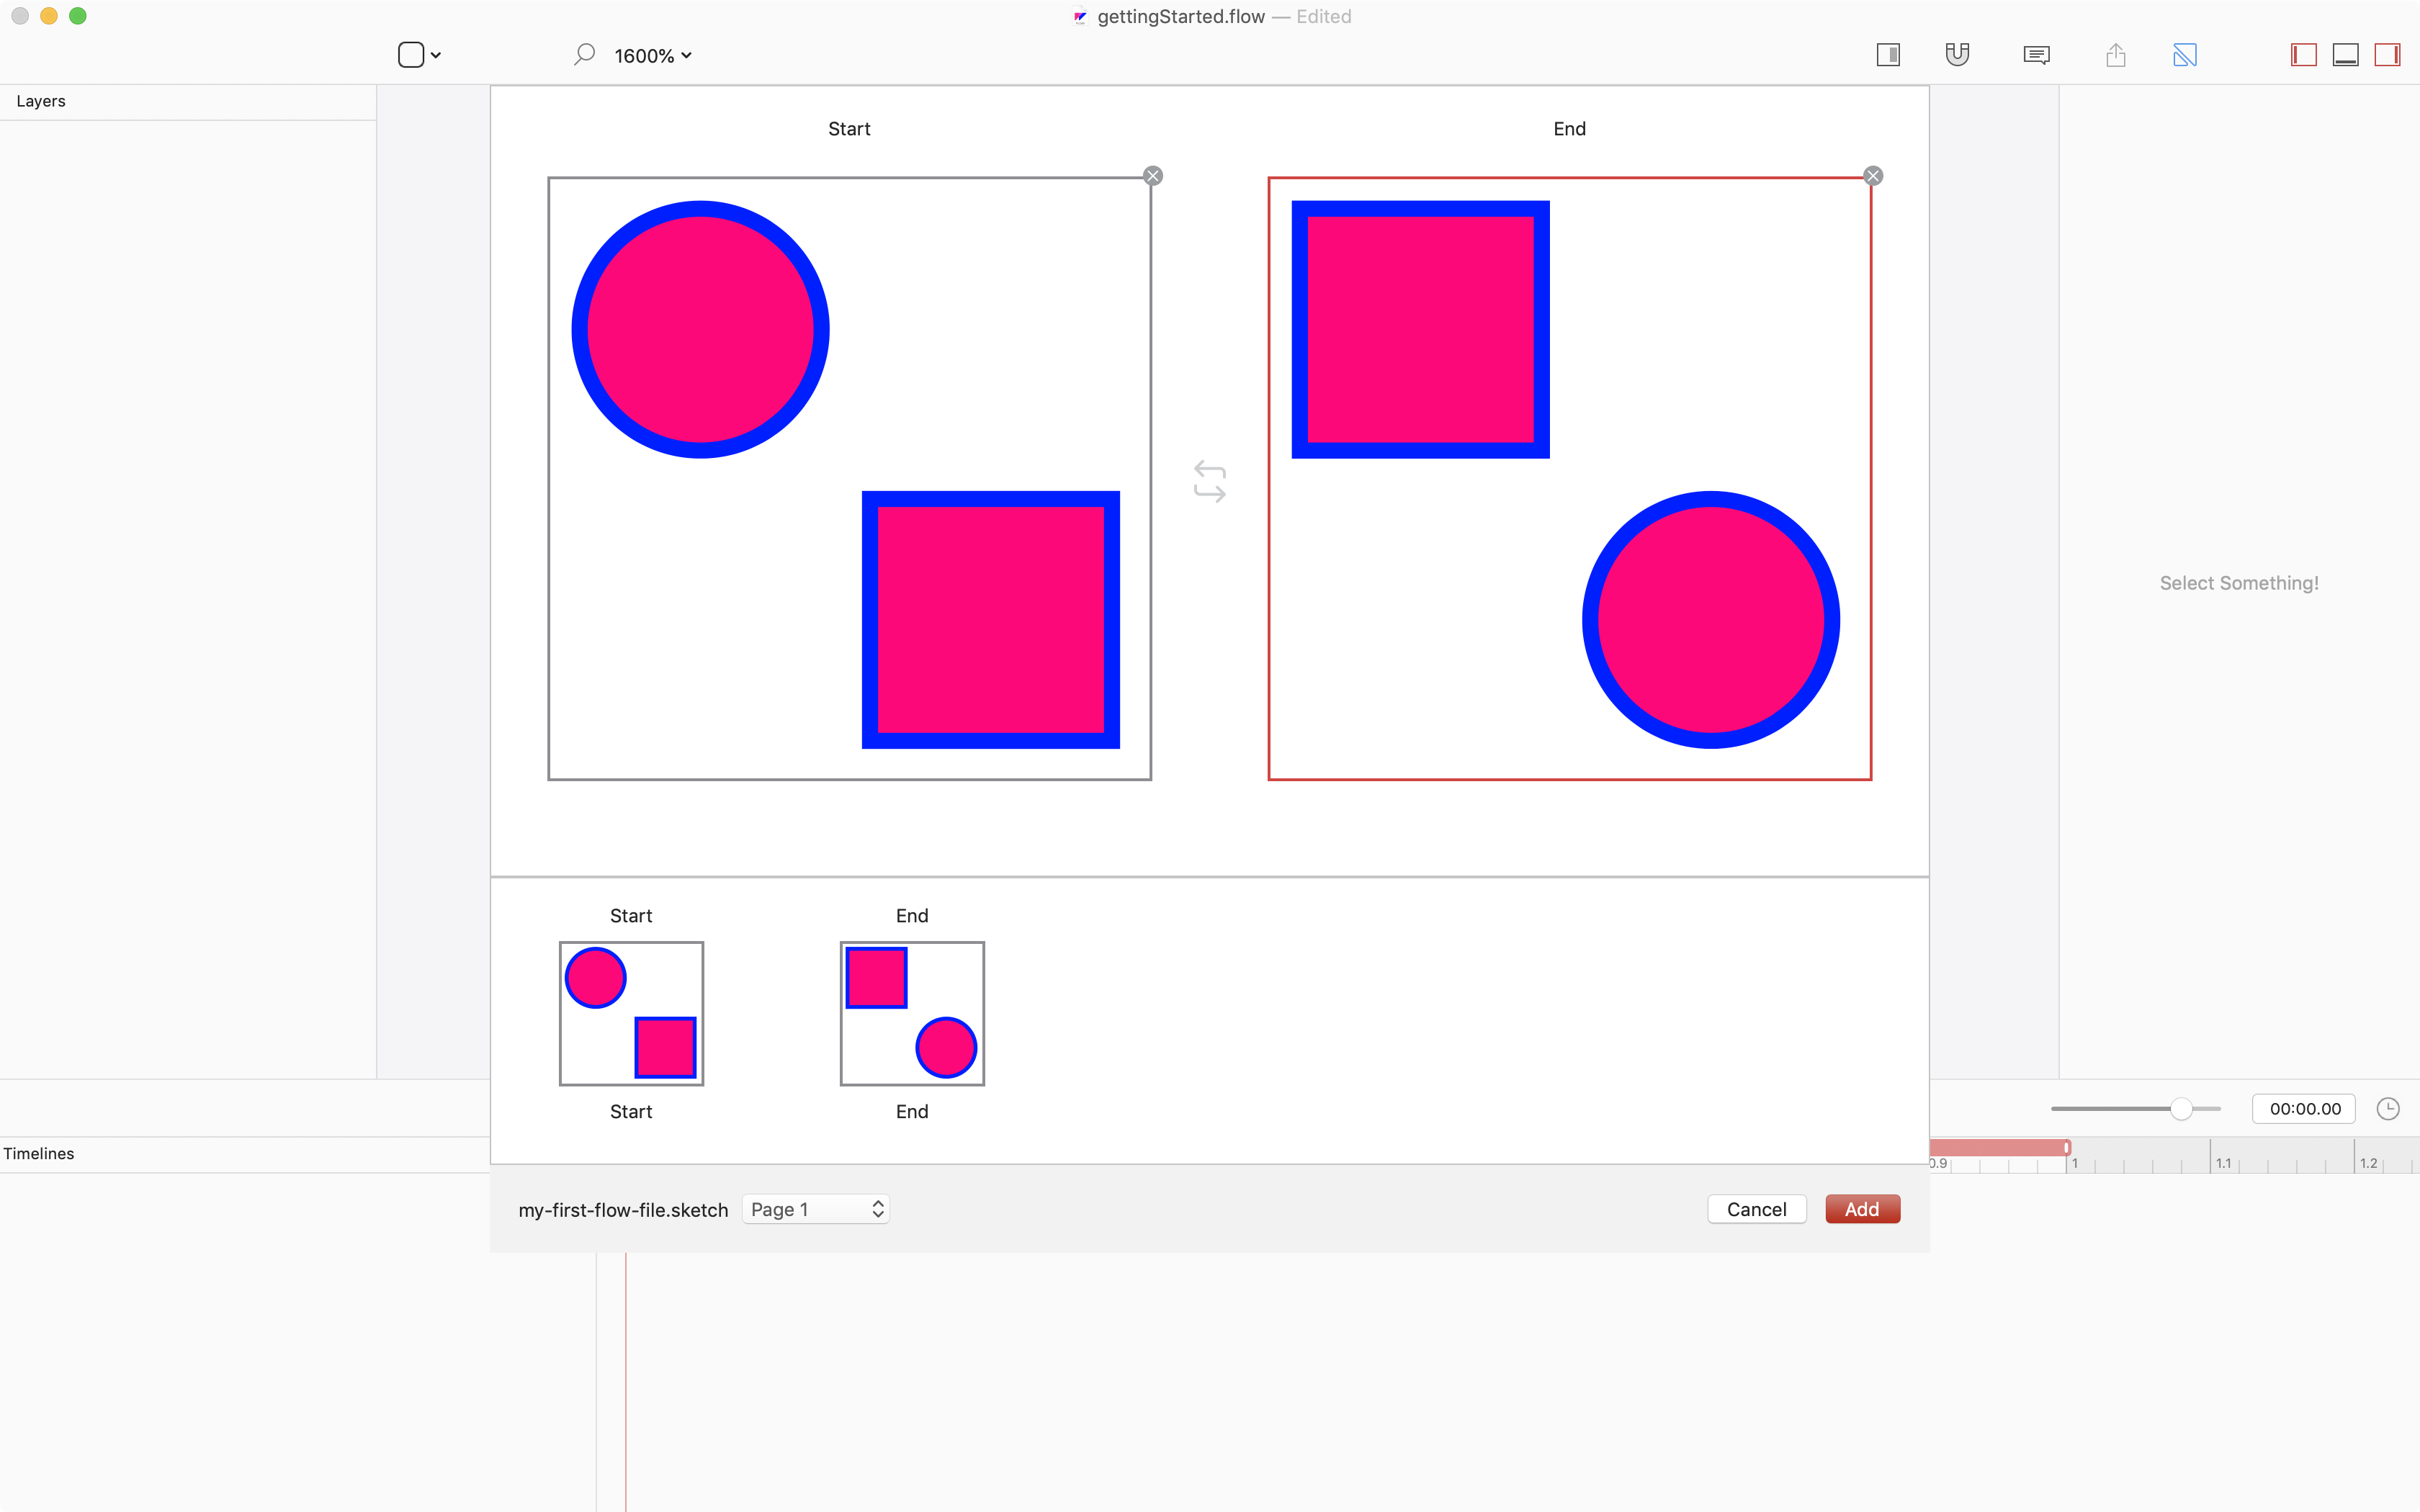
Start and End artboards - When you’re done, hit
Addthen check out the timeline. Your project should look like this:
A basic animation - Click
Play!
Flow automatically interprets the differences between layer properties and animates them for you.
In Flow
You can also create and animate directly in Flow. If you don’t want the extra hassle of linking a Sketch file and setting it up correctly, this is the fastest way to get started.
To do this:
- Select
New Projecton the Welcome Window - Select
Create an Empty Timeline. - Add a Rectangle
- Add a Circle
When you create an empty timeline, you need to add layers to animate yourself. You can do this using the Insert menu or the shortcut in the main menu bar on the top of the interface.
You can copy and paste from most other applications directly into Flow!
For simplicity’s sake, let’s set up the same shapes – a rectangle and an oval – in Flow.
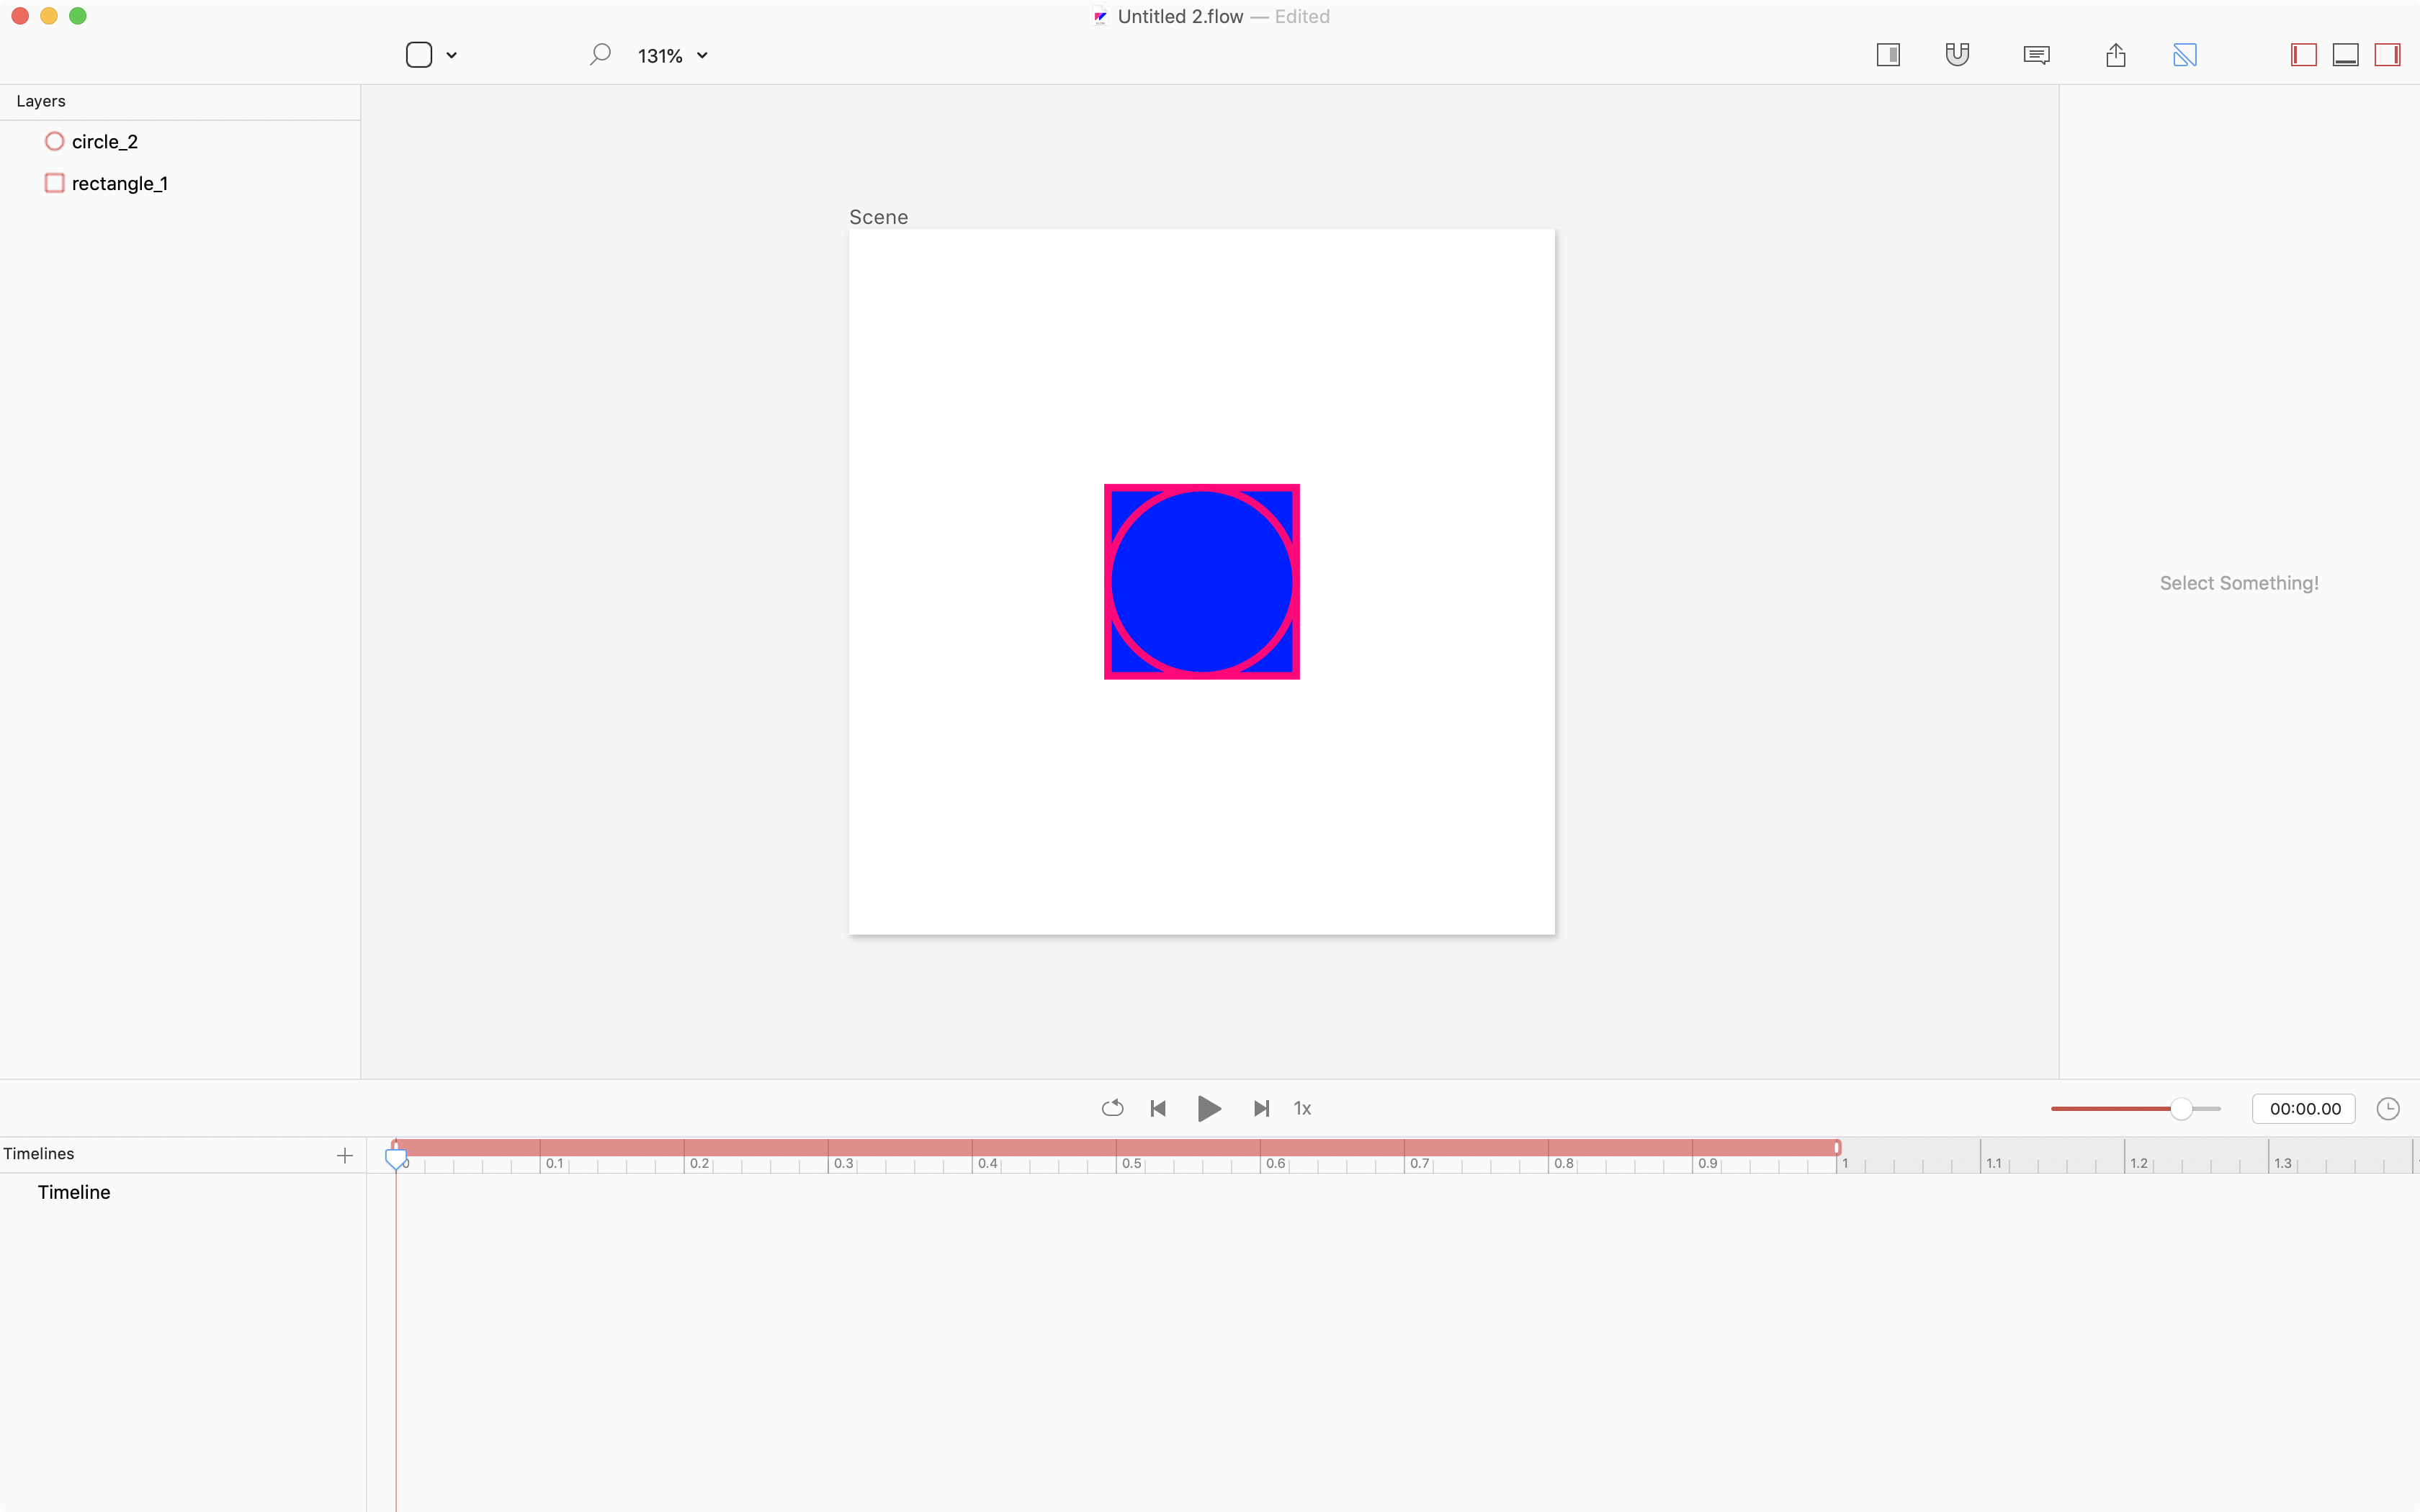
You’ll notice there’s no auto-generated animation when you simply add shapes from within Flow – unlike in the Sketch file example. When working directly in Flow, we have to specify all animations ourselves.
Let’s talk about how to do that in the next step!
Animate with the Timeline
Animating in Flow is easy, whether you started with a Sketch file or not. All you need to do is position the playhead and then move an object.
When you move the playhead and a shape on the canvas, two timelines labeled rectangle_1 and circle_2 appear in the timeline area. If you open the sliders up you see that each as an X and a Y timeline nested inside of them. The X and Y timelines each have a small icon on them, and if you click it you see the following:
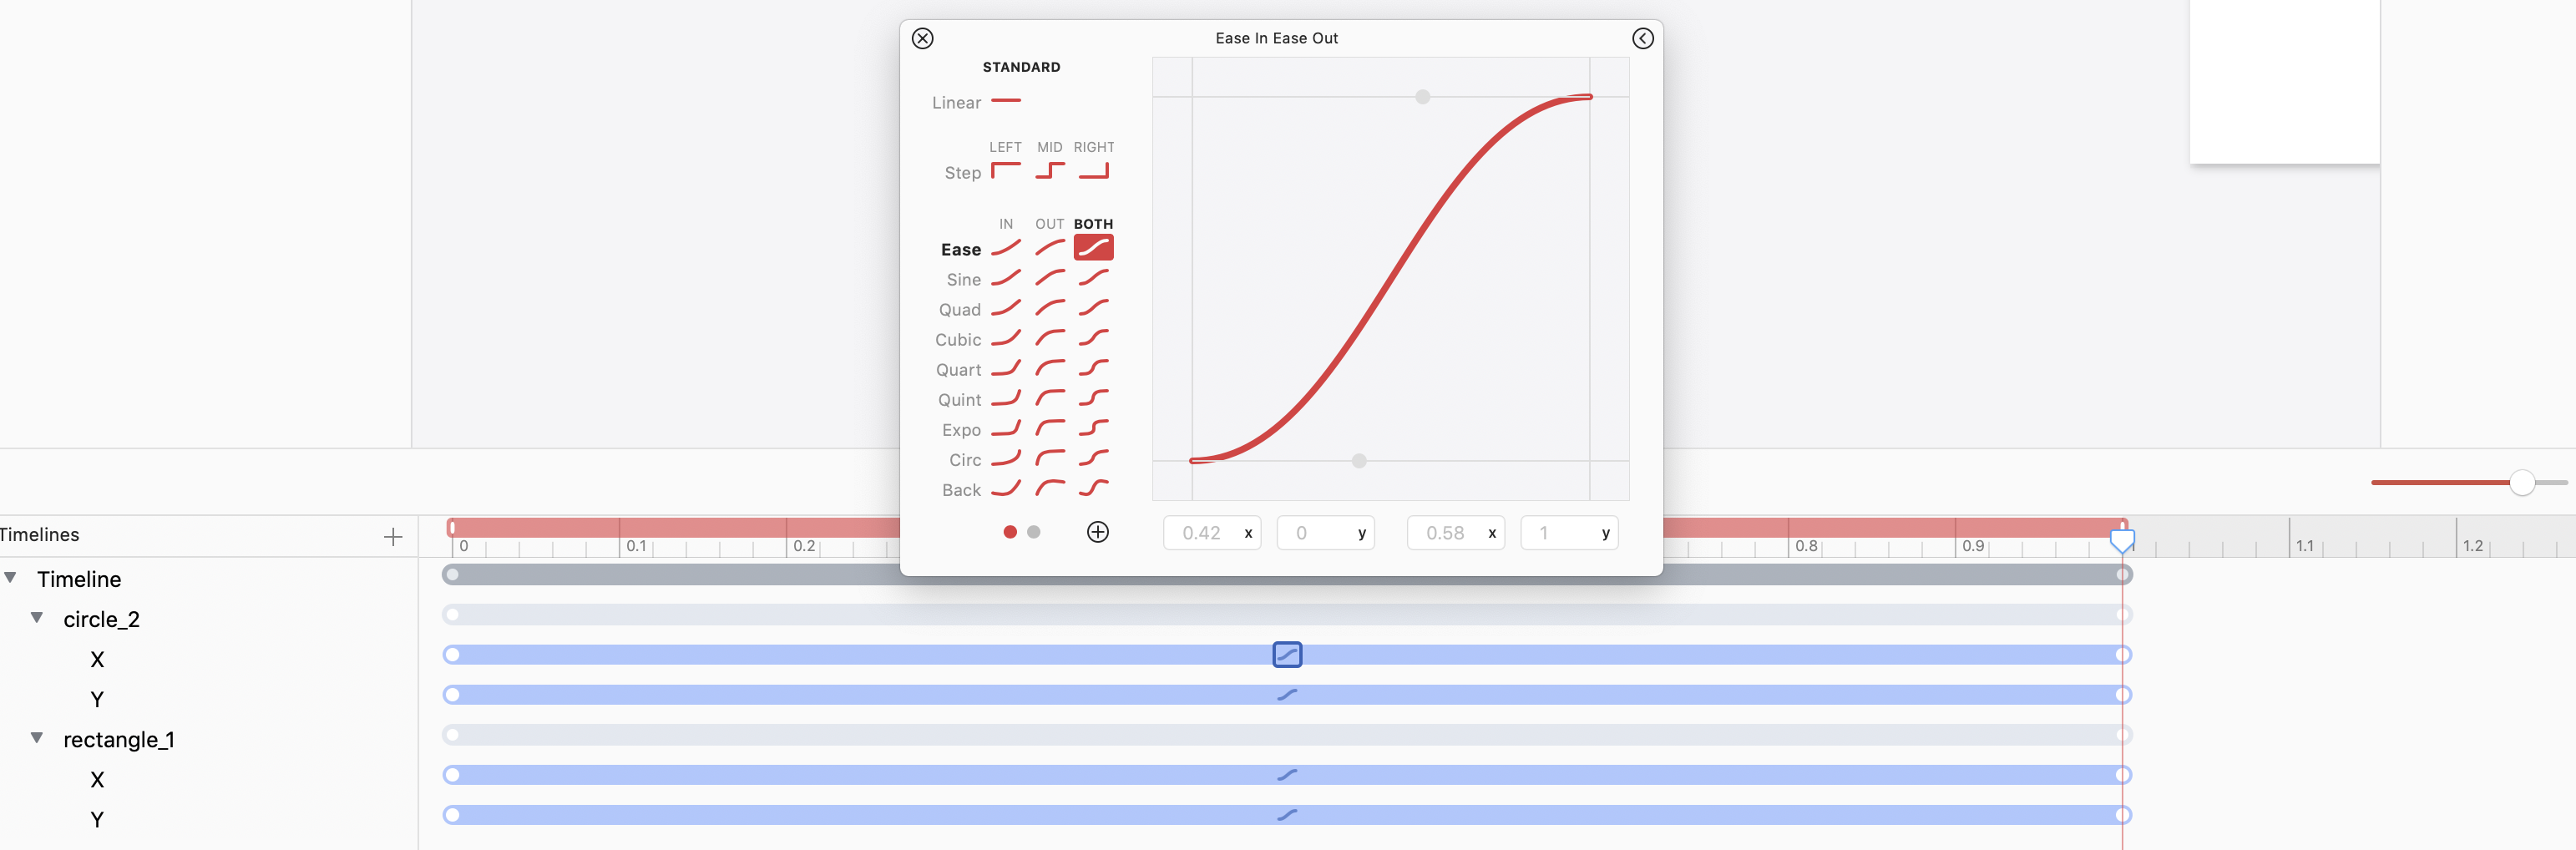
These are the Transition options. If you have CSS background, these are the same as easing. These allow you to adjust the speed and style of the motion.
You’ll also notice a row of blue dots where you placed the playhead previously. When you move the timeline indicator and manipulate a layer, Flow creates a key value to indicate where the change takes place. You can drag these key values around the timeline to change the timing of the animation. You can also adjust the overall length of the animation using the clock to the upper right of the timeline.
And that, in essence, is it!
You can animate any layer option available in the properties panel when a layer is selected: opacity, background color, position, size, outline, and more. You can also delete any animation you’ve done by right-clicking it in the timeline and selecting Delete.
There’s far more you can do when animating in Flow, but we’d recommend reading through some of our Tutorials for more details. Try the following for next steps:
Export Code
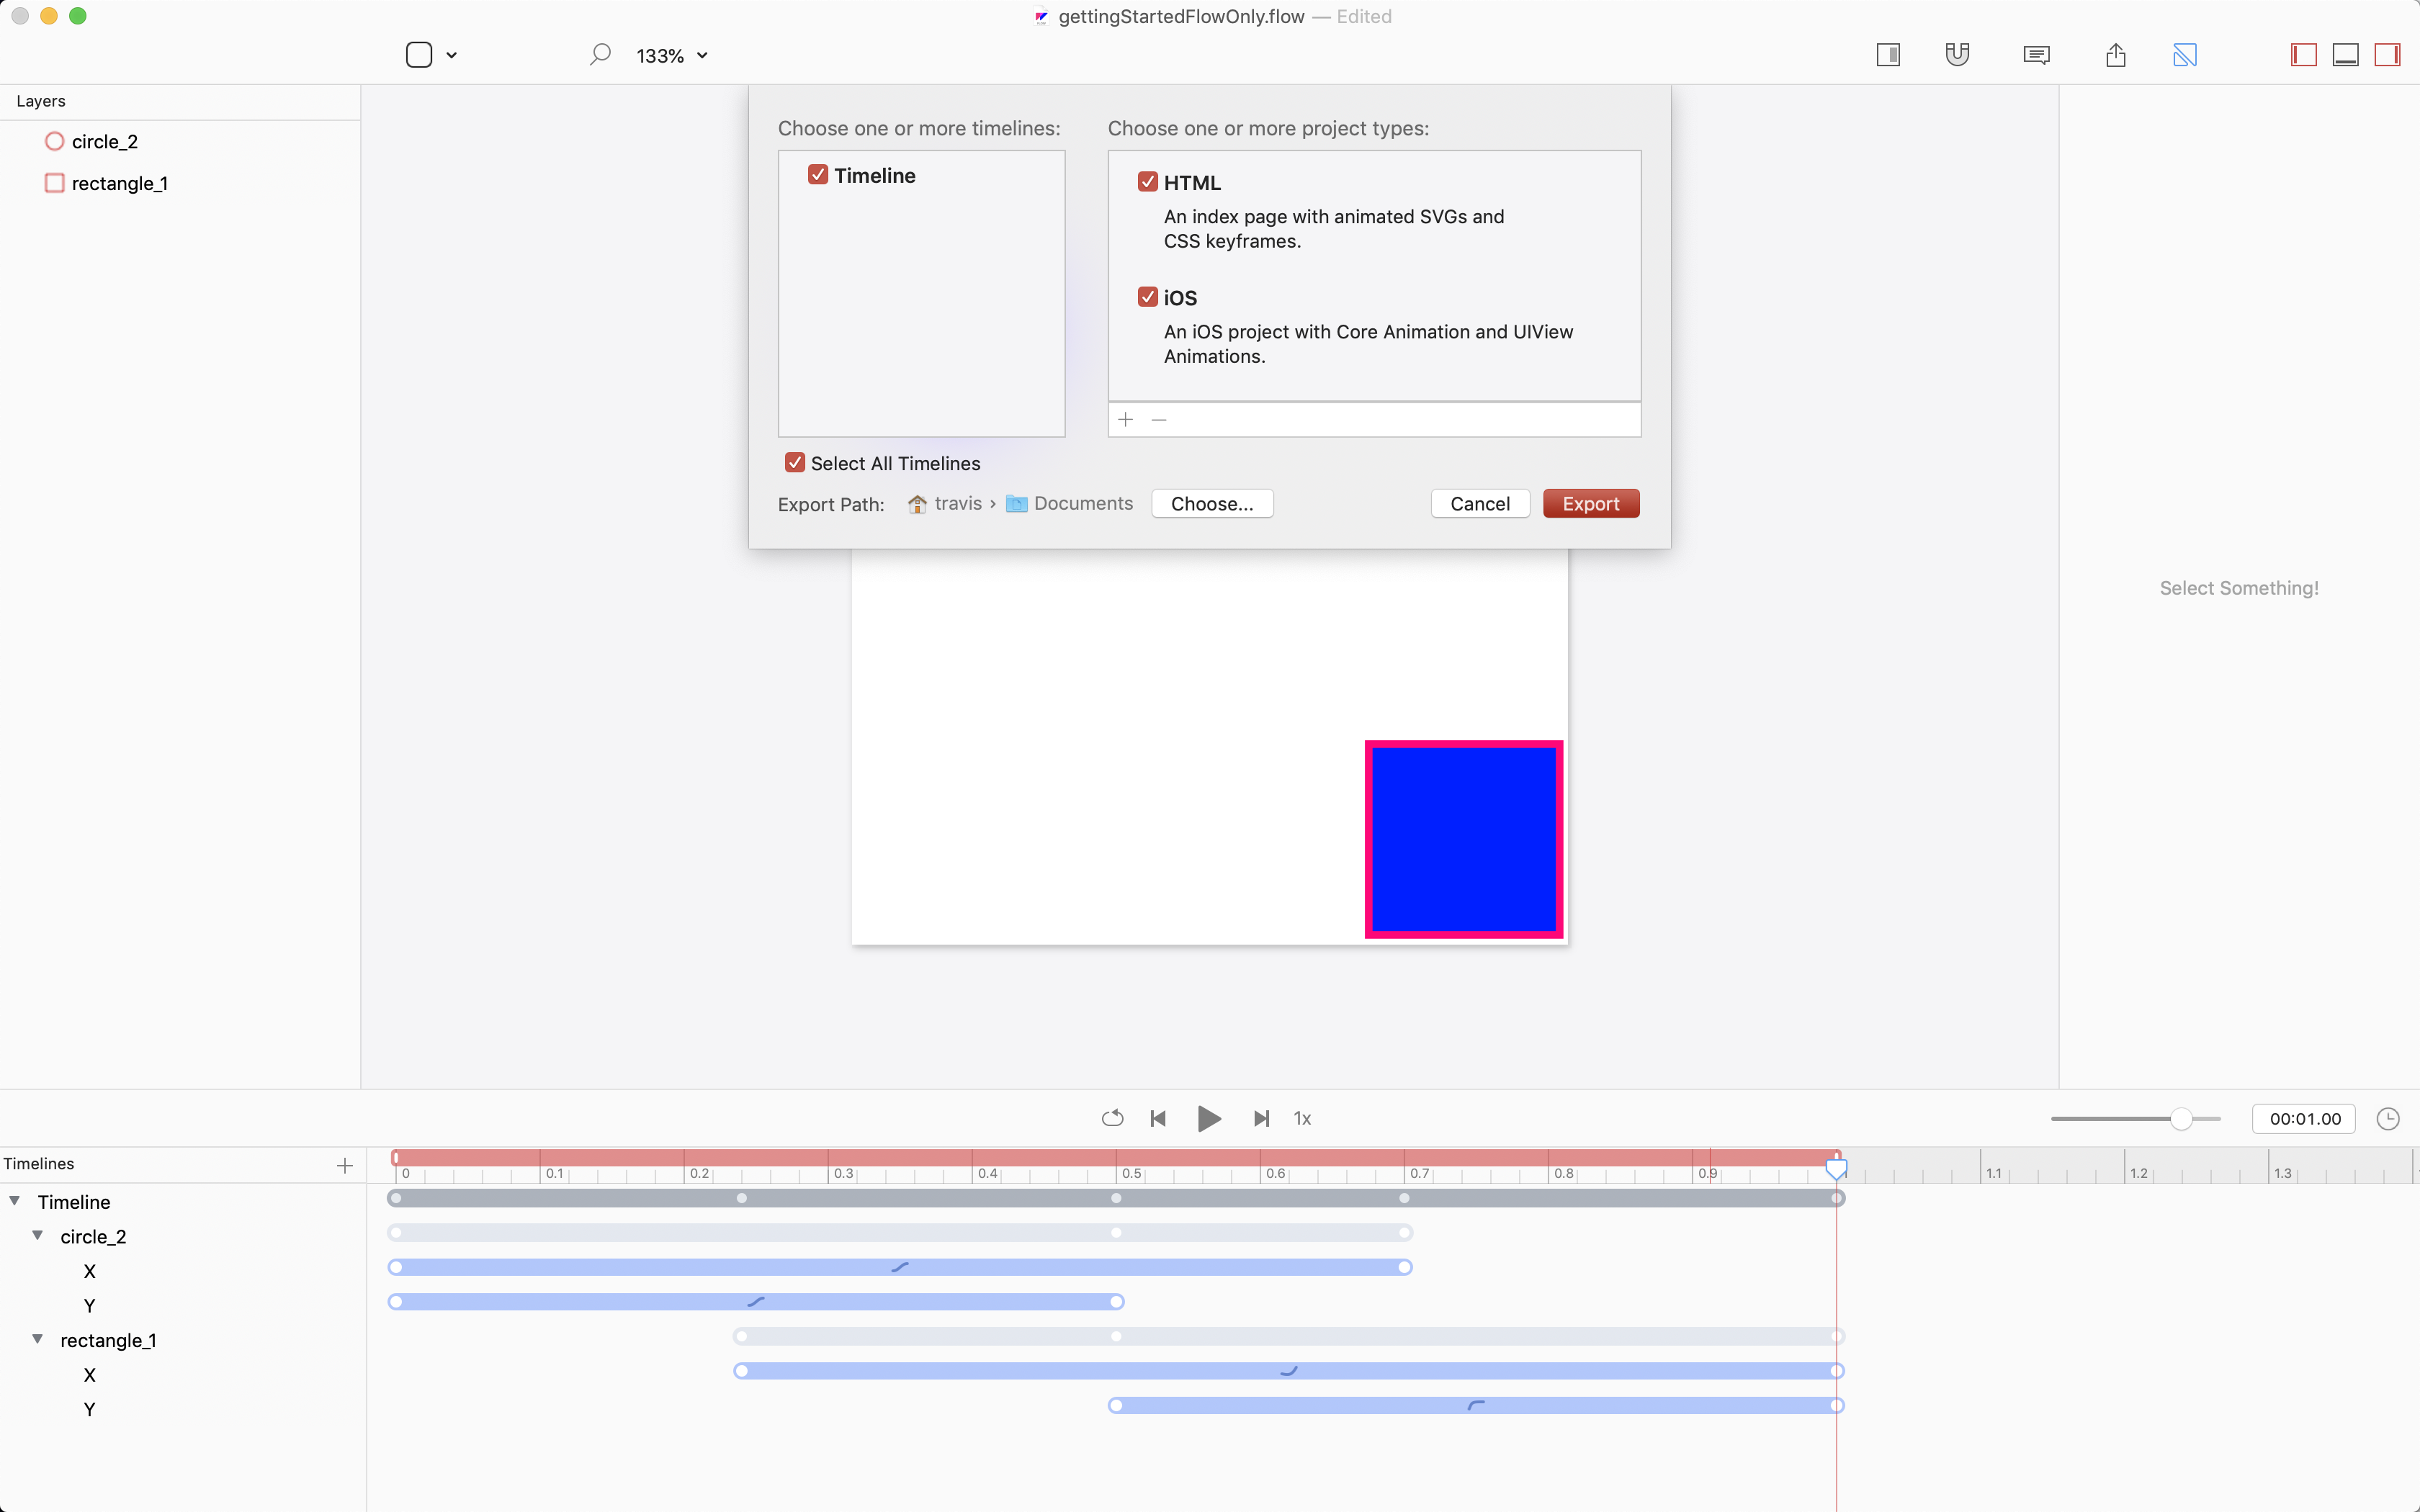
One of the coolest things Flow can do for you and your team is export working code for your animations directly from the application. This saves time and reduces effort for the entire team.
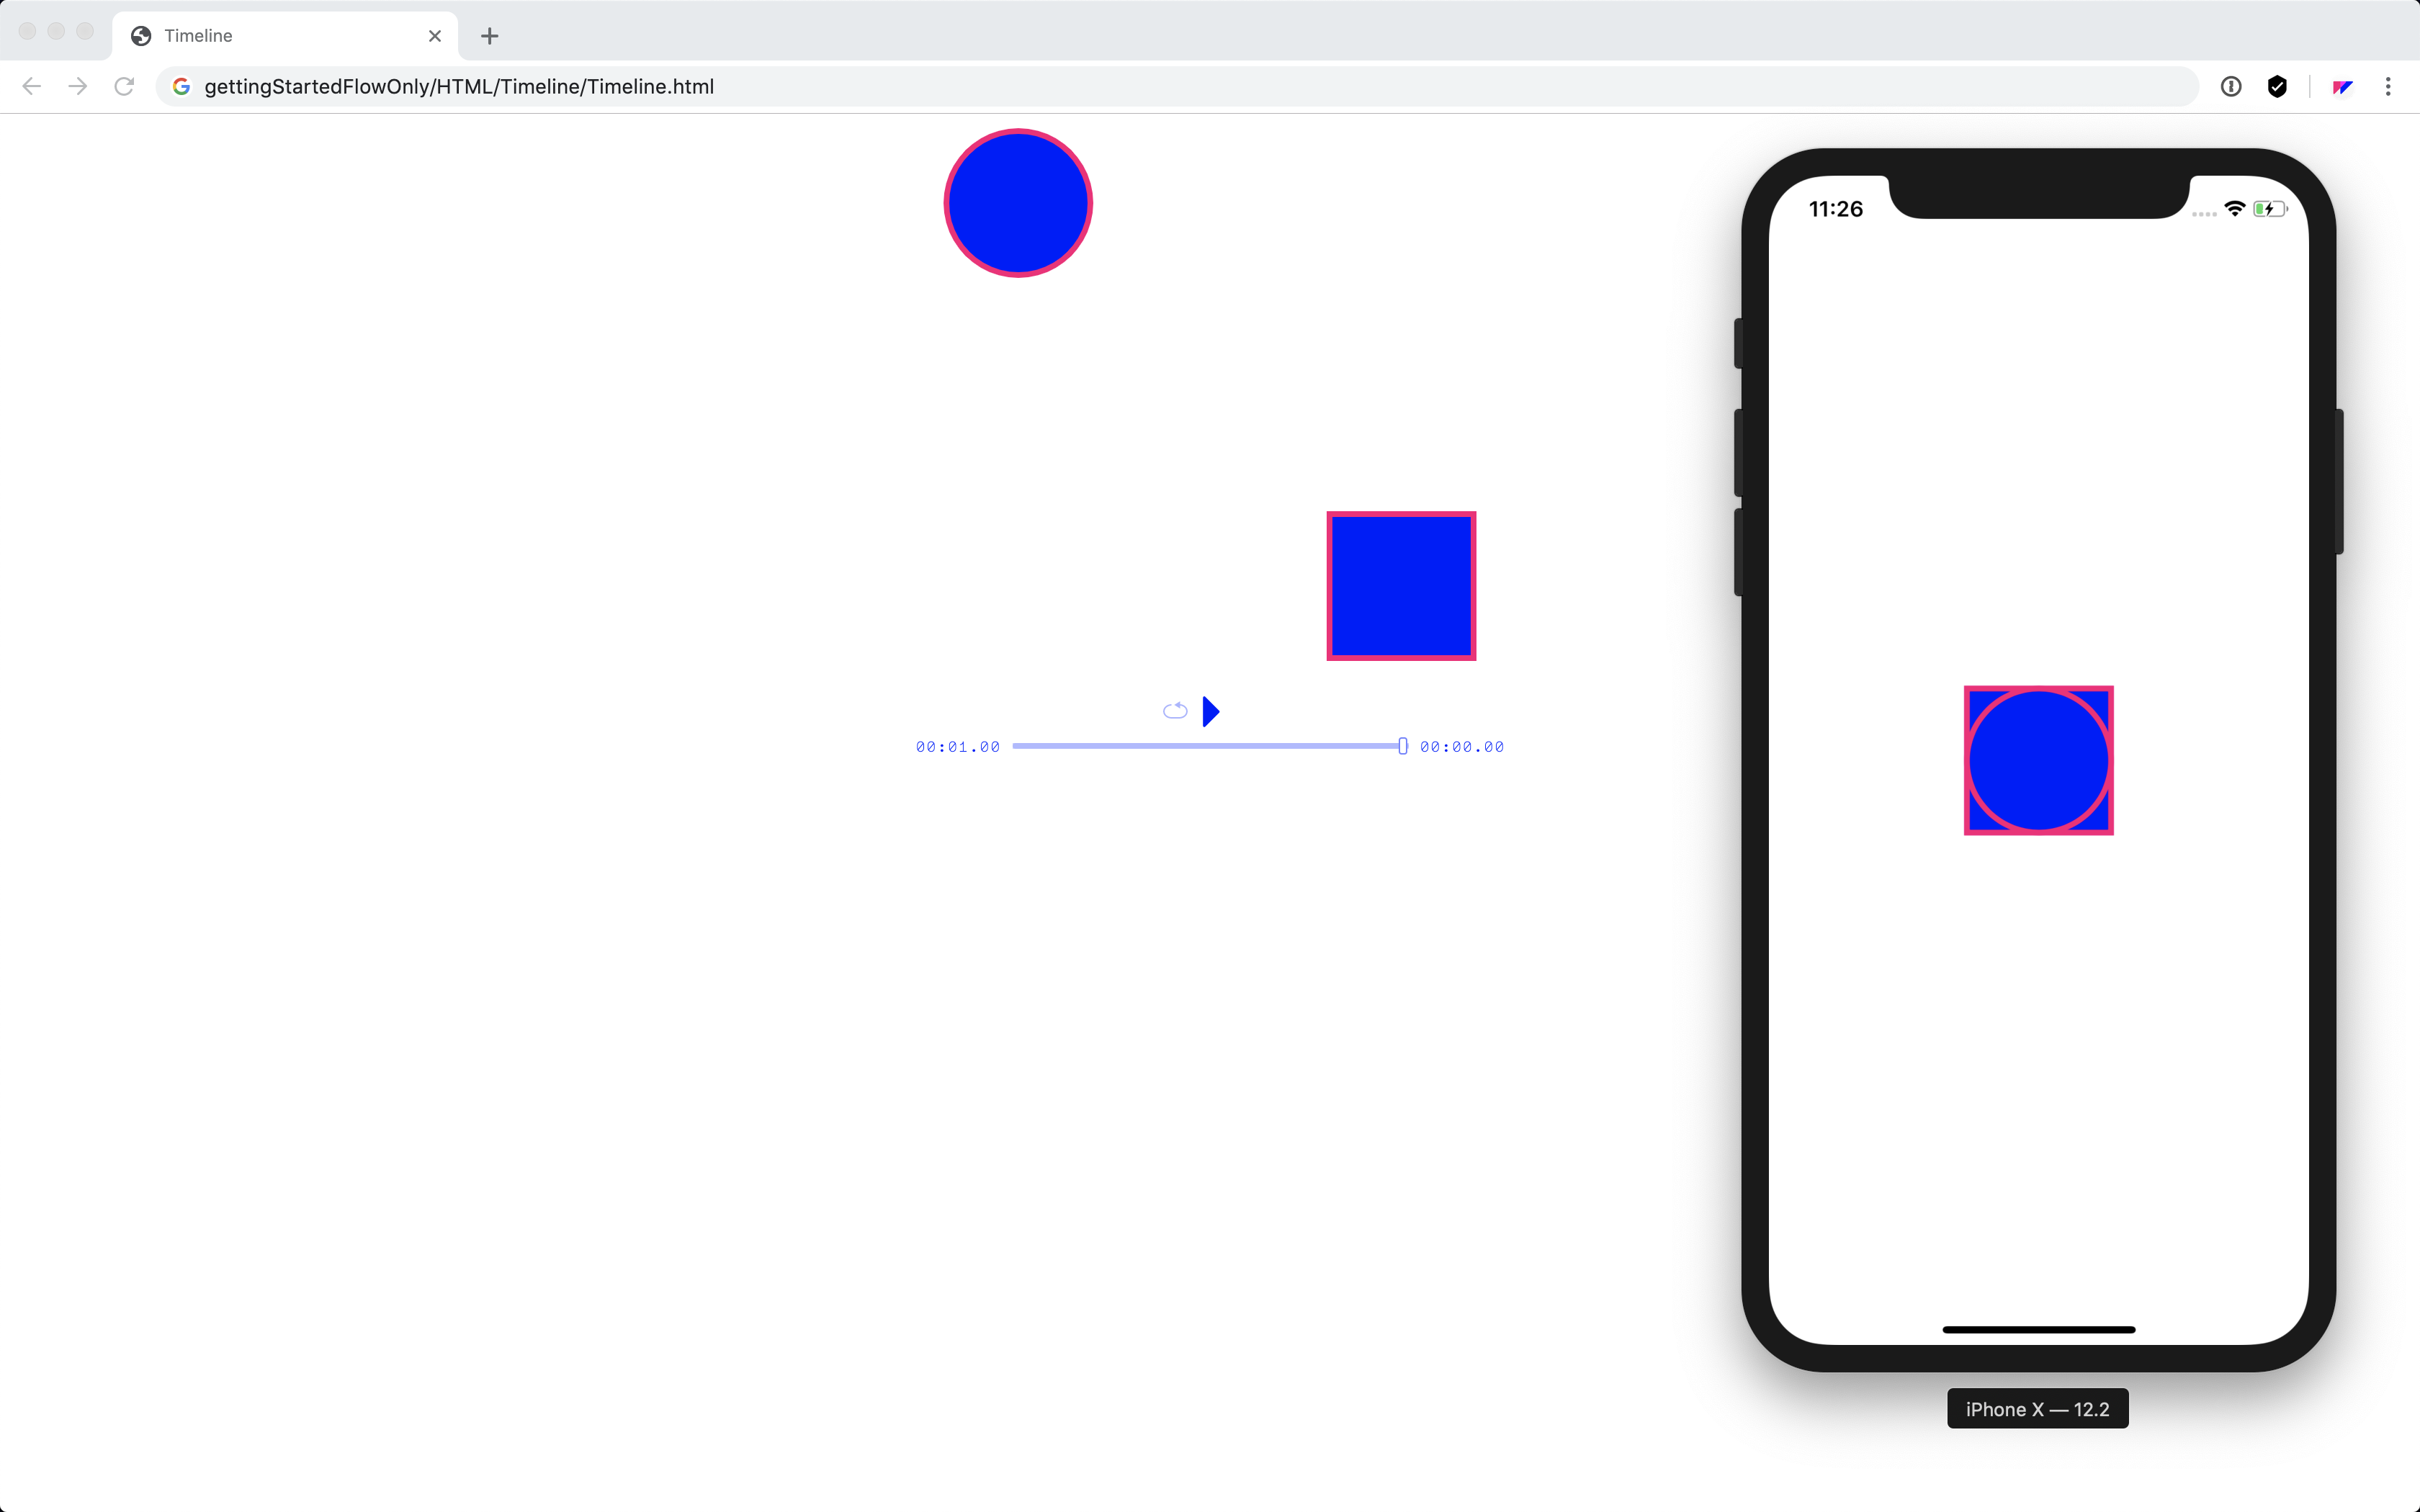
To export code from Flow, navigate to File > Export > Code. You have the option to export iOS and HTML animations.
And, here is a shot of the html site and iOS simulator from the project we were working on:
Next Steps
Explore intro.flow
There’s so much more you can do with Flow that we didn’t cover in the last section, but that’s why Flow comes with a handy sample file, intro.flow.
You can access this from the launch screen as we mentioned previously..
.. but you can always access it in the menu under Help > Open sample Flow file.
This file shows you a number of different animations you can create with Flow. The easiest way to learn using the file is to expand the timelines and see which elements are animated.
For example, let’s look at the paths timeline, which results in this animation.

If we expand the paths timeline in Flow, we see the following:
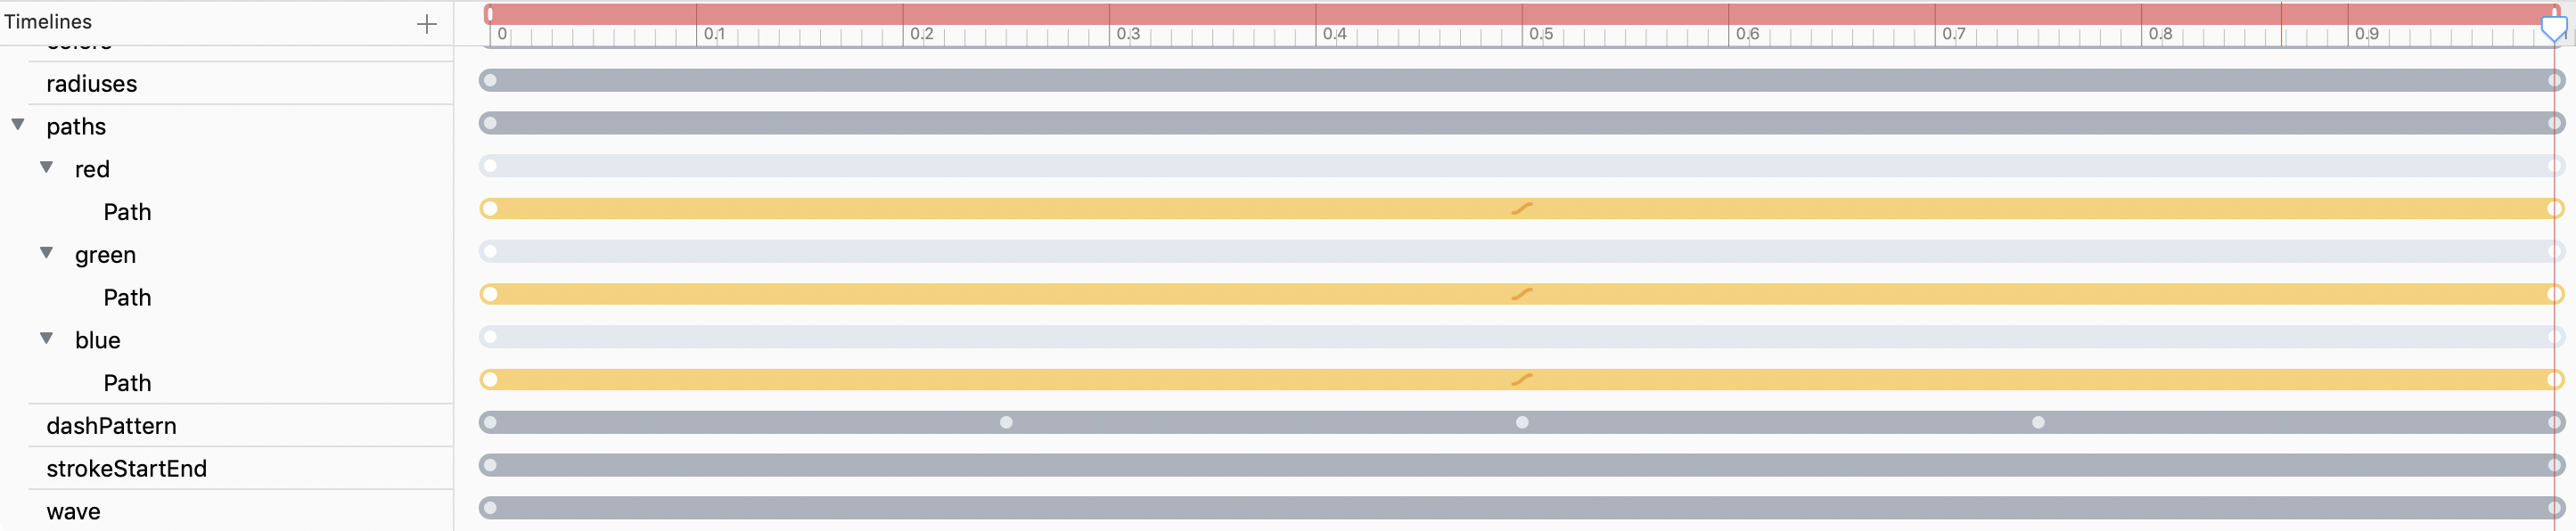
This lets us know that the layer’s Path property is being animated.
The intro.flow file has the following timelines:
move: animates theXandYproperties.rotate: animates theRotationproperty.scale: animates theSizeproperty.shadow: animates theShadow Color,Shadow Radius, andShadow Offsetproperties.hierarchy: animates based on a linked Sketch file’s layer hierarchy.colors: animates theFill ColorandStroke Colorproperties.radiuses: animates a shape’s radius.dashPattern: animates dashes around a shape.strokeStartEnd: animates theStroke(outline) of a shape.wave: animates a wave pattern using theXandStrokeproperties.image: animates the size of an image using theWidthandHeightproperties.imageFade: animates the opacity of an image using theOpacityproperty.mask: makes an image colorful using a masking technique.constraints: animate’s a layer group and scales the layers inside of it accordingly.group: animates a layer group’s properties as well as the layers in the group.text: animates a layer’s text.
Learn more
Flow has lots of great tutorials to learn more from. We recommend the following as your next reads:
- Import and Animate Sketch Files
- Learn more about the Timeline, keyvalues, and Easing curve.
- Animate the Codepen, Github, or Sketch logos in our tutorials section
- Learn more about exporting iOS Swift and HTML code, and their file structures
- Learn about structuring your design files properly in the Setup Sketch File Hierarchies doc.
- Hop on our Slack channel to get in touch.
Register Flow
Soon it will be time to upgrade your free trial to a full version!
Visit the Download page to register your version of Flow today.
Spread the love!
Flow is made by a small but mighty team. If you like what you see, consider giving us a little love on Twitter!